![]()
Starting your catalog project.
Project Setup Dialog.
To quickly set up your basic catalog information, use the Catalog Wizard to start.
The Catalog Wizard will assist in setting up your catalog by guiding you through most of the steps. The first thing you will be instructed to do is to setup the project name and other relivate information about your catalog.
Setting up your project (Catalog)
This dialog is to assign general information about your catalog such as project file name, web site address, and title page.
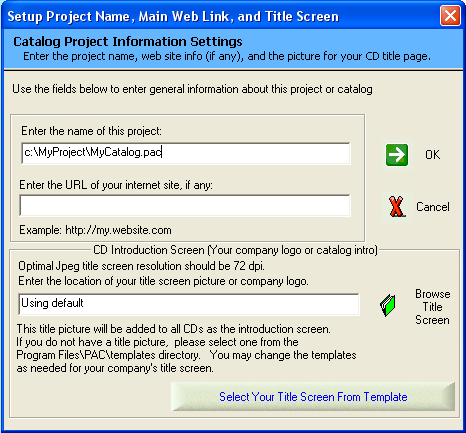
Project Name:
You must assign a file name for your catalog in the first field. This file name will be use to save your catalog data so that it can be automatically retrieve the next time you use the program.
Your Web Site Address:
If you have an internet site that you want to appear in the help section of your CD catalog, enter the URL of your site in the URL field.
You must enter the URL of the site starting with the 'http://'.
If you do not have a web site, please leave this field blank.
Selecting your title screen for the CD.
To save time you can change the title screen of you catalog by selecting from one of Personal Archive Creator predefine templates. This is also know as selecting your introduction screen.
This will be the first thing that your buyers will see when they view your CD catalog.
To assign the title screen click the 'Select Your Title Screen From Template' button at the bottom of the dialog. You may also choose to use your own title screen from any jpeg or Flash® animation file (*.swf) by clicking the browse button on the dialog.
These files must exist some where on your computer and will be copied to the CD at the time when you are burning the catalog CD.
To continue, press the OK button.